Various scenarios may require sending email messages or other types of notifications to users as part of the process flow. For example, certain types of exceptions that cannot be handled automatically may require manual intervention. For example, a BPEL process can use the notification service to alert users by voice, IM, SMS, or email.
In a previous article (http://sudhakarsoa.blogspot.com/2010/07/configure-soa-suite-11g-for-sending.html) I described recently how the fairly new SOA Suite 11g can use GMail or other public Email servers to send notifications, for example from BPEL processes or the Human Workflow Service. The SOA Suite 11g works with the User Messaging Service (UMS) to perform that feat and the essence of said article is to configure the email driver in UMS to use GMail – or any other email server for that matter.
This article looks at one of the other communication channels available in UMS, and also available to BPEL processes: Instant Messaging or Chat. After configuring the UMS XMPP driver in the Enterprise Manager console, the Chat channel is available to any BPEL process. We will discuss how to configure – and with which configuration details for Jabber.org – and subsequently how to make use of that communication channel from a BPEL process.

Prerequisites
Before you can apply this article, you need to have installed the SOA Suite 11g, configured the SOA Domain and have the AdminServer and the SOA Server running. You also need access to the Oracle Enterprise Manager Fusion Middleware Control Console. You will also need JDeveloper 11g with the SOA extension in order to create a SOA Composite Application through which to test the Chat capabilities.
You also need to have an IM account on an XMPP Driver (or Yahoo, MSN, AOL or ICQ). To try out hooking up SOA Suite 11g to Instant Messaging, you can quickly create an account on a public chat service like jabber.org (takes no more than two minutes).
Deploying the XMPP driver
After the default installation of the SOA Suite 11g, the XMPP driver is not automatically deployed – unlike the Email driver. The drivers for XMPP, SMPP and Voice are installed but not yet deployed. So that is what we need to do first in order to be able to use the chat channel. You can deploy additional drivers in a variety of ways using: WebLogic Server Administration Console, Oracle Enterprise Manager, WLST commands, and through the Oracle Fusion Middleware Configuration Wizard.
We will use the WebLogic Server console in this article. This can be accessed at http://host:7001/console.
In the Domain Structure region of the console (the tree on the left side), select the node Deployments.

The Home page for Deployments appears. Click on the install button.

The Install Application Assistant appears. Use this page to locate the application you want to deploy.
The application you need to deploy is in the SOA Home directory under the Fusion Middleware Home directory created when installing first WebLogic and on top of it the SOA Suite: FMW11g_HOME\SOA_HOME\communications\applications. The XMPP Driver itself is in the file called sdpmessagingdriver-xmpp.ear.

Click Next. You are asked to choose the targeting style. Choose Install this deployment as an application (also the default option).
As a deployment target, choose the server soa_server1.

Press Finish on the summary page. In order for your deployment to be complete, you may need to activate your changes (depending on the mode WebLogic Server is running in); if so, click Activate Changes in the Change Center.

Configure the UMS XMPP Driver
The User Messaging Service comes with a number of drivers that each handle traffic for a specific channel. One of the drivers controls the XMPP (IM) channel. This driver needs to be configured with the properties of the XMPP IM Server (or proprietary network) and the account from which messages are sent.
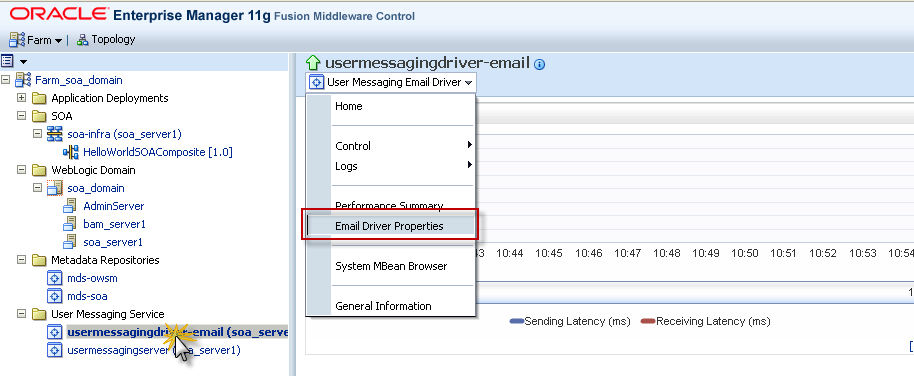
Go to the Oracle Enterprise Manager Fusion Middleware Control Console (typically http://host:7001/em) and open the User Messaging Service node.

Select the node for the XMPP driver. From the drop down menu, select the item XMPP Driver properties.

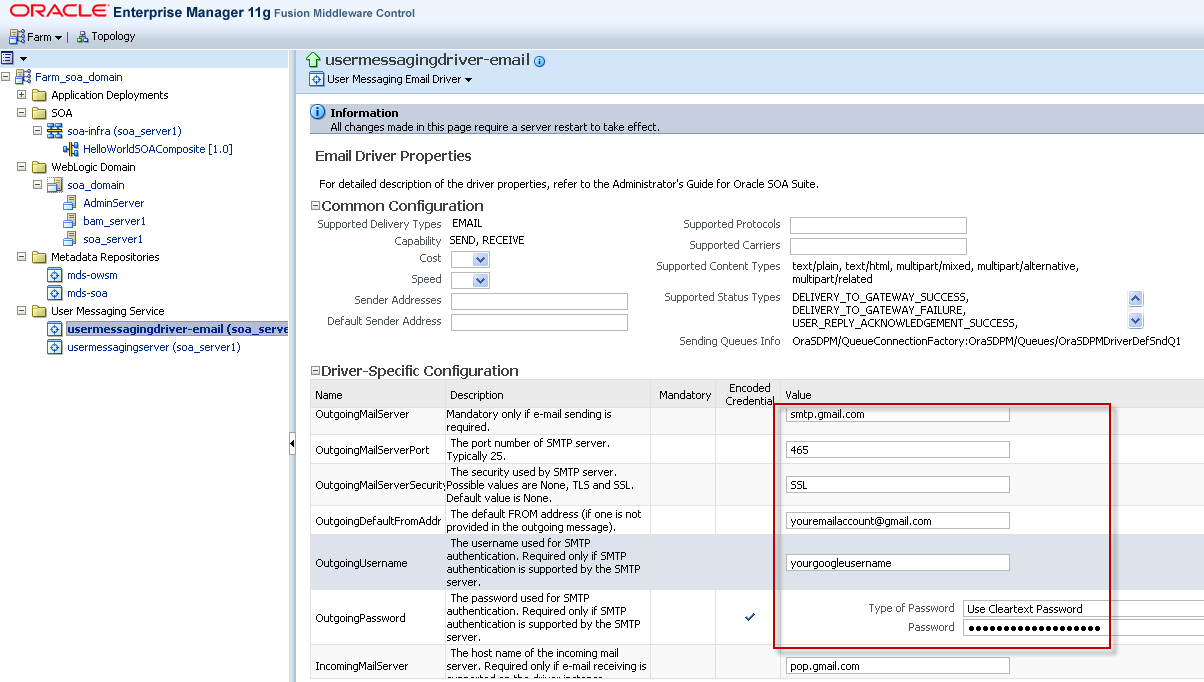
The form that is now shown allows you to set various properties on the XMPP Driver, including the details about the server to be used by the driver for chat operations.
The properties that need to be configured for instant messaging are:
- IMServerHost – Jabber server host name. For multiple servers, use a comma-delimited list (for example, my1.host.com, my2.host.com). If only one host name is specified, it is used for all accounts. The IMServerHost for Jabber.org is: jabber.org.
- IMServerPort Corresponding comma-delimited list of Jabber server ports; the Jabber.org Server Port is 5222
- IMServerUsername List of Jabber usernames to login as (these user accounts are automatically created, if necessary, on the corresponding Jabber servers). If you have multiple servers listed above, there must be an equal number of usernames (one username per server). If you have only one server listed above, all usernames listed here use that server. The username you need to enter here for Jabber.org is your Jabber.Org Account name, without the @jabber.org bit – so just johndoe or hanktheknife.
- IMServerPassword Corresponding comma-delimited list of passwords for each username listed above.

Press Apply. To have these settings take effect, the Server has to be restarted.
Note: the UMS XMPP driver can also be configured to support proprietary IM networks including Yahoo, MSN, AOL or ICQ IM .
Configure the Notification Service
We have to explicitly allow the Notification Service to not only use email but in fact all communication channels for sending notifications.
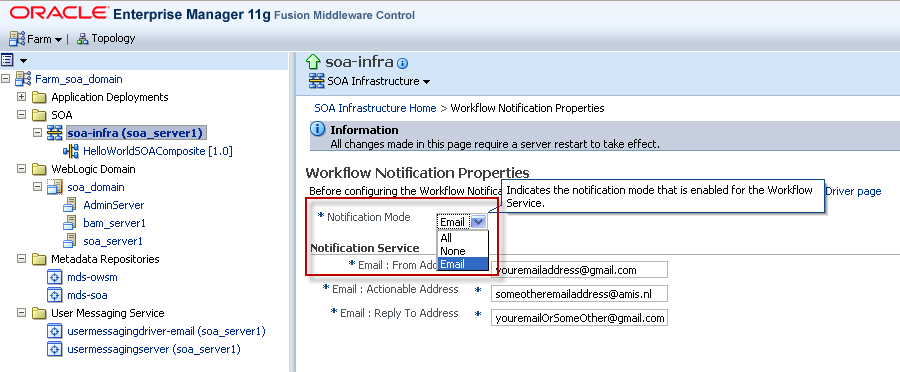
Navigate to the properties form via the dropdown menu for SOA Infrastructure, under SOA Administration:
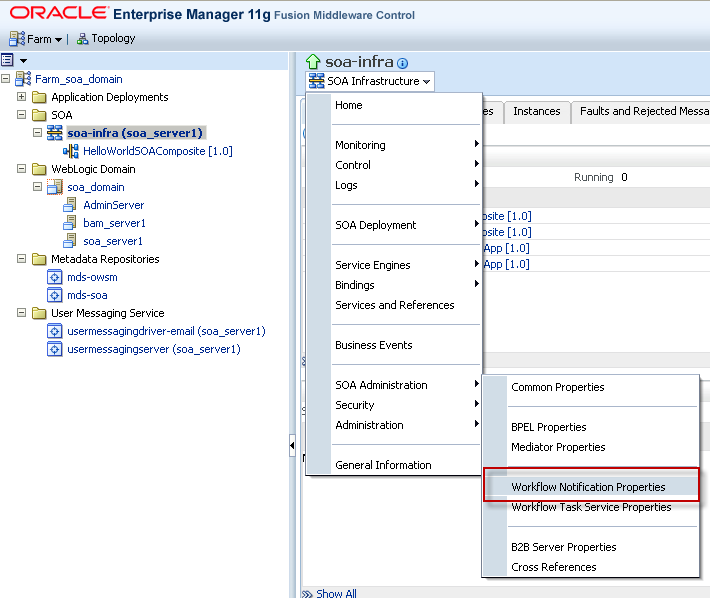
The Workflow Notification Properties are shown. Only one is really important at this point: the Notification Mode (default value is None) must be set to All , otherwise any notification for any other channel than email is not really sent onwards by the SOA Suite to UMS!

At this point, the SOA Server needs to be restarted to have the changes take effect.
Create the chatty Composite Application
We will create a very simple composite application to try out the message sending capabilities we should now have at our disposal. Go through the normal steps:
1. Start JDeveloper (choose Default Role if you are prompted to select a role)
2. From the menu option File, choose menu item New. From the New Gallery that is presented next, select the SOA Application item in the Applications Category (under the General node).
You will be prompted to provide a name for the application – for example GoogleTalkFromBpel – and a name for the project – the same or any other name will do nicely. JDeveloper then asks you what type of composite application this will be; pick ‘Composite with BPEL’ on the Configure SOA settings step. Press Finish to have the application, project and service composite created.
3. The Create BPEL Process dialog comes up next. Specify the name for the new BPEL process – Talkative – and the Template: Synchronous BPEL process. Leave the checkbox Expose as SOAP Service checked and accept other defaults as well. Press OK.
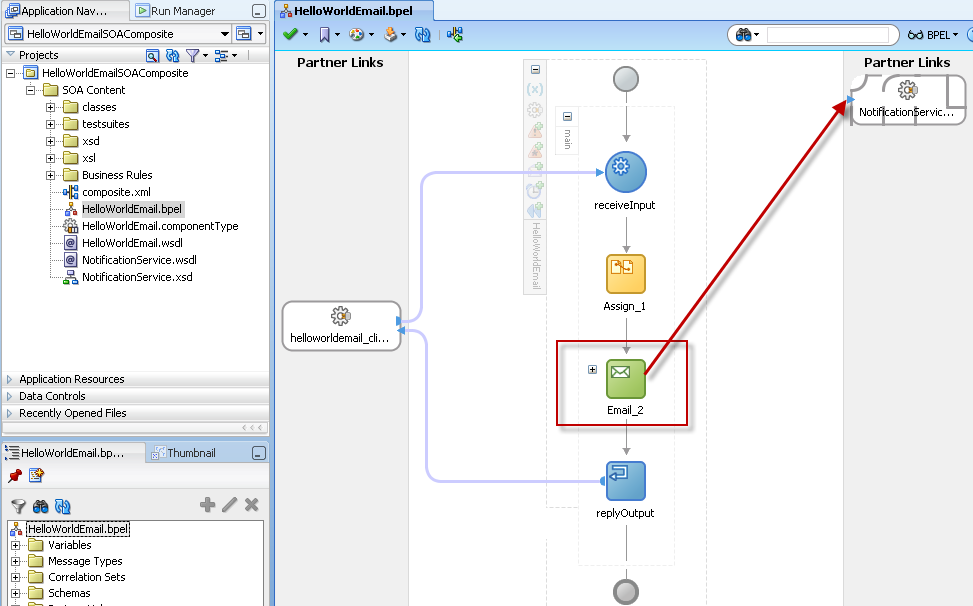
4. The BPEL editor opens up. You will see the basic structure of the BPEL process with a receive and a reply activity, by default configured to receive a single string and return a single string. You need to add one activity to set the value of that string result: drag and Assign activity from the Component palette and drop it between the receive and reply activities already in the process.
Double click the assign activity, to open the editor. Click the green plus icon and select the Copy Operation from the drop down list. The client:result element in the outputVariable is the obvious target for the Copy Operation. Use the client:input element in the inputVariable as the source.
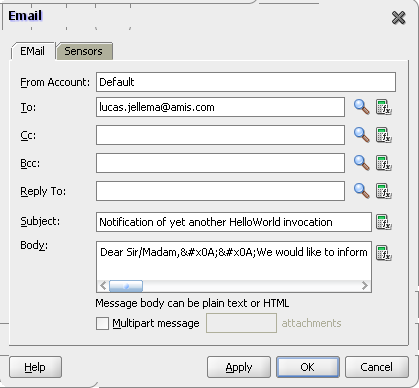
5. Now it gets interesting: drag the IM activity from the component palette and drop it just below the Assign activity. The IM activity editor pops up. We have to specify the address to send the IM message to and the body of the message we want the BPEL process to send.

The To: field is set to: jabber|googleTalkAccount@gmail.com. The part jabber| is used indicate the protocol to use. The value behind the pipe character is an account on some IM server, in this case the googleTalkAccount@gmail.com. Note that the server account that has been configured in the XMPP driver needs to have this account set up as a chat contact – you cannot just start chatting to anyone on Google Talk, Jabber.Org or MSN.
The value in the Body field can be set using hard coded text and expressions that use values from the input message or any BPEL variable. For example:
Hi,

Message from the Talkative BPEL process via Instant Messaging.

This notifications informs you of the fact that the BPEL process has been invoked and is almost done executing.

The value of the input string was:
<%bpws:getVariableData('inputVariable','payload','/client:process/client:input')%>.

The request was made around <%xpath20:format-dateTime(xpath20:current-dateTime(), '[D1o] [MNn], [Y] at [H01]:[m01]:[s01]')%>

Later!
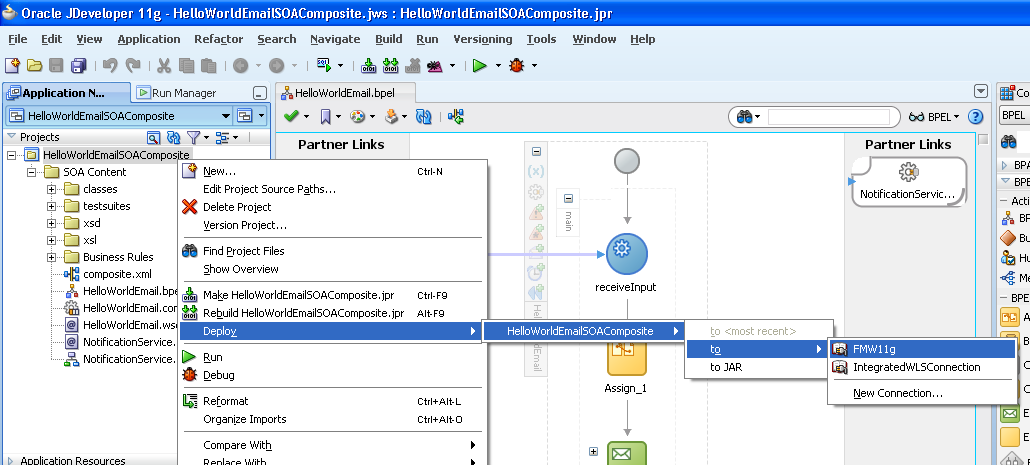
6. Deploy the Composite Application to the SOA Suite.
Run the Composite Application
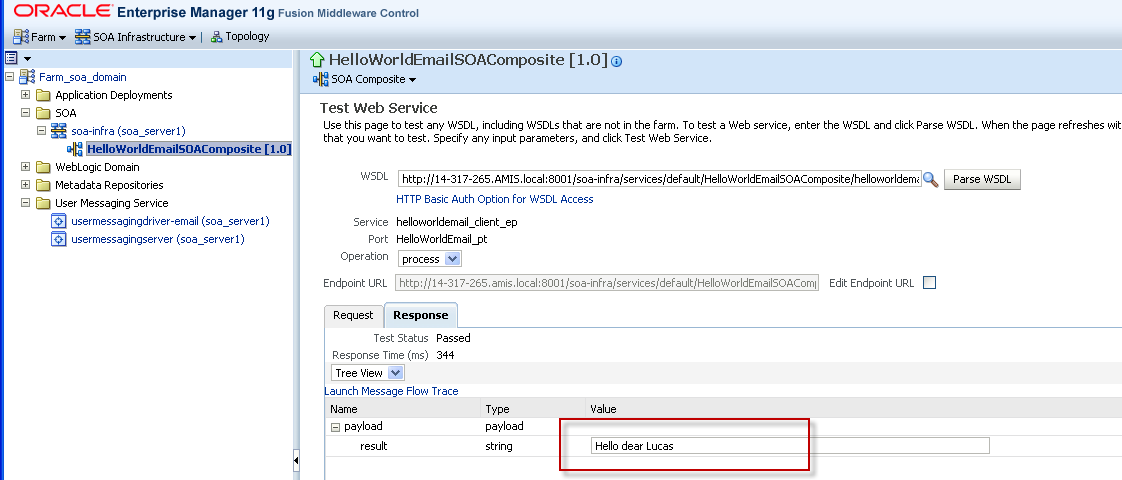
Open the Enterprise Manager (http://host:7001/em). Expand the node SOA node under the root node Farm_soa_domain. The node for GoogleTalkFromBpel application should be listed. Select the node. The right side of the page is refreshed to present the details for this composite application. Click on the Test button to call the service exposed by this composite application. Enter a value for the input field – for example your first name – and press the button labeled Test WebService. The web service is invoked. This will create a new instance of the composite application. After a few seconds, the result from the service should be displayed, the same string that went into the service.

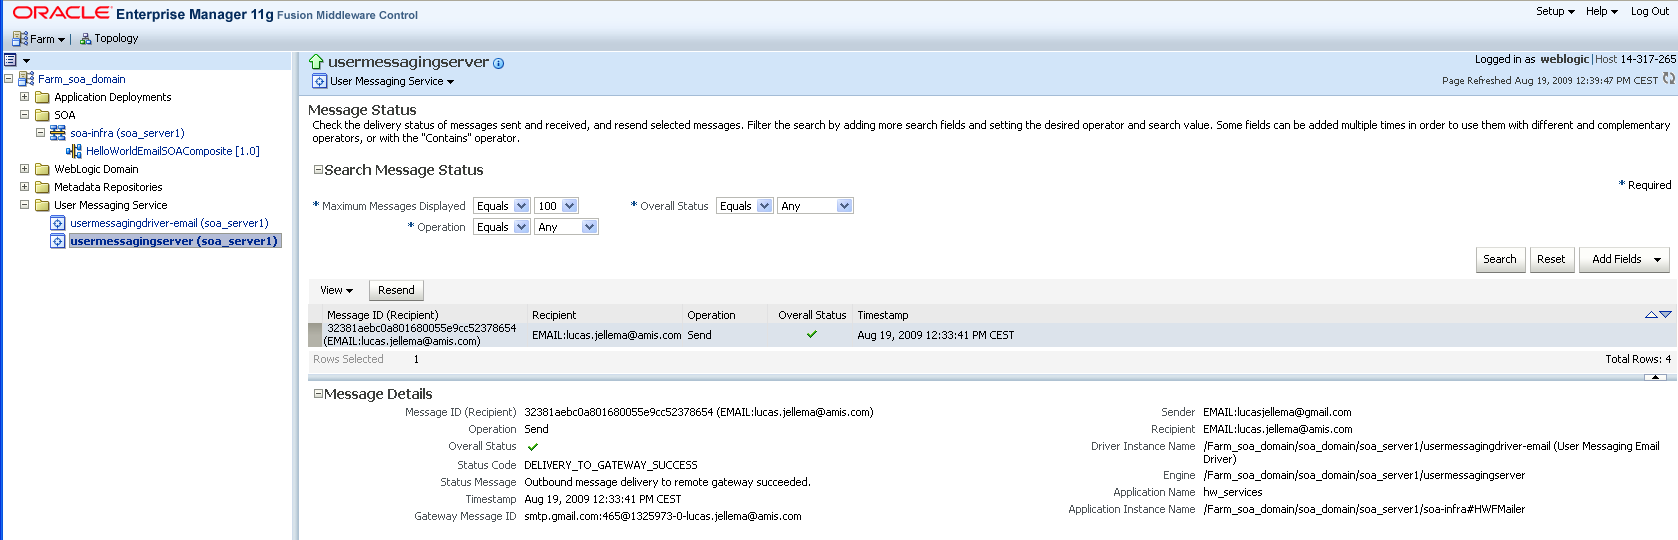
As part of the now completed instance of the composite application, a call is supposed to have been made to the Notification Service that in turn engaged the UMS that approached the Jabber.org IM server to send a chat message on behalf of the BPEL process instance. We can see trace of this message on the Message Status page for the User Messaging Service in the Enterprise Manager console.
And it shows up in whatever Chat client we are using:
Note that here we have the BPEL process send a notification of type Instant Messaging to the UMS that links for the IM channel to the configured IM server (Jabber.org) at the configured account (lucas.jellema@jabber.org) and sends the chat message from that account to the addressee (the To: field in the BPEL IM activity), which happens to be a Google Talk account.